Gestures
For navigation there are three primary gestures, that are shared regardless of what platform you are on.
- Click/Tap
- Click/Tap and drag
- Click/Tap and hold
The App Bar
 The app bar, as seen above, refers to the bar that spans across the top of the GPA. This contains your basic controls.
Navigation/Hamburger Menu
 Found at the top left of the app bar, it opens the navigation drawer which lists all Views.
Additionally, after opening it, it has information about the user, and two buttons at the top right.
The red button logs the user out, while the other closes the drawer.

Database Synchronization
 The next icon is the database synchronization button. Hovering over it shows the user when the data was last updated directly from Interact. Typically, this happens when the user first logs into the GPA, or when the dates change. Therefore, if you open the application and leave it running for an extended period, or update anything in Interact, the data will eventually become outdated.
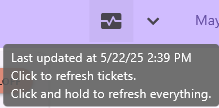 There are three ways of synchronizing to the database, and all can be used depending on the desired outcome.
| Sync | How to perform | Updates | Speed | When to use | |
|---|---|---|---|---|---|
| Partial | Click the data synchronization icon. | ONLY tickets are updated this way. If there are changes to anything else, eg. Jobs, Job Items, Accounts, etc., the changes will not be reflected. | Fast | You’ve made an adjustment to a ticket and want to quickly check it. | |
| Full | Click and hold the data synchronization icon. | This updates all the information that is pulled from Interact. | Slow | You’ve made a change to a job and want it to be reflected | |
| Refresh | Refresh the browser by clicking the refresh icon or pressing F5. | Refreshes all the information, as well as some additional things on the backend. Functionally, it is the same as a full sync. | Slowest | Only if there is a problem with the application. |
Full Refresh
Performing a full refresh will reset ALL filters, dates, and anything else you might have changed. This can add a lot of time when trying to get back to what you were previously looking at.
Filters
 The filter button follows the Database Synchronization button, and it is a simple arrow pointing down. Clicking it, will display the entire filters menu.
While the exact options available to filter vary from view to view. They will all look similar to the following:

Tip
Use as many or as few filters as needed.
Filtered Results
Filters affect everything in the GPA! Reports will contain different values when filtered. Be on the lookout for the “Data is filtered” indicator if results seem odd. This is what the indicator looks like:

Filter Options
Each filters purpose is outlined below. Dropdown menus will let you select an option, while chips are only able to be toggled on (checkmark) or off (red).
Search Bar
Allows you to type freely and it will attempt to match tickets that match the condition.
Searching tries to match:
- Truck number
- Job Name
- Job Number
- Hauler ID
- Hauler Name
- Material Codes
- Material Name
- Client Name
- Ticket Number
Tip
Tickets do not need to match the search text exactly. This can be used to match a range of tickets.
Searching for “RC”, will match all recycled materials. Searching for “AGGXP”, will match all Aggregate Express trucks.
Truck Type Dropdown Menu
Filters by the truck type that fulfilled a ticket.
Ticket Type Dropdown Menu
Filters by the ticket type.
Stock Chip
Whether to include restock tickets or not.
Samsara Chip
Toggles the Samsara integration on or off.
Only Flagged Chip
Displays tickets with one or more ticket flags.
Show Names Chip
Only available for Summary Reports
Whether to show the Interact ID, or a human readable name. E.g. For a job, it would be the difference between T12002 and BARN FM SAVAGE STONE (ROUND TRIP).
Group By Dropdown Menu
Only available for Summary Reports; More in-depth explanation there.
Apply Filters
 Applies filters that have been changed.
Reset Filters
 After applying one or more filters, a new reset filter button will appear next to Apply Filters. This button will reset the filters and display everything once again.
Apply your filters!
Filters are not applied as you select them. You MUST click the apply button on the right hand side.
Date selector

 The last item in the app bar shows a single date or a date range depending on the current selection.
By default, and upon opening the application, the date will be yesterday.
When clicking the button, a calendar will open that allows the user to select a date range.
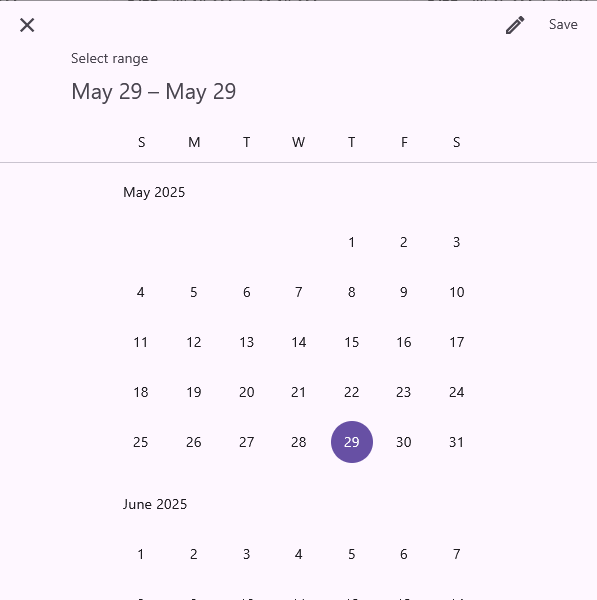
Users may also click on the pencil icon at the top right to manually type in the desired dates.
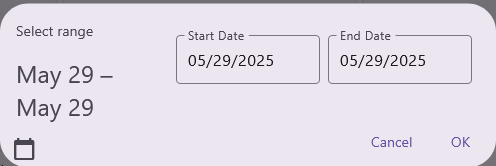
After pressing “Save” or “OK”. The GPA will immediately start loading the data for the selected date range.
Time Cutoff
The start date begins at 12:00AM (0:00), and the end date ends at 11:59PM (23:59).